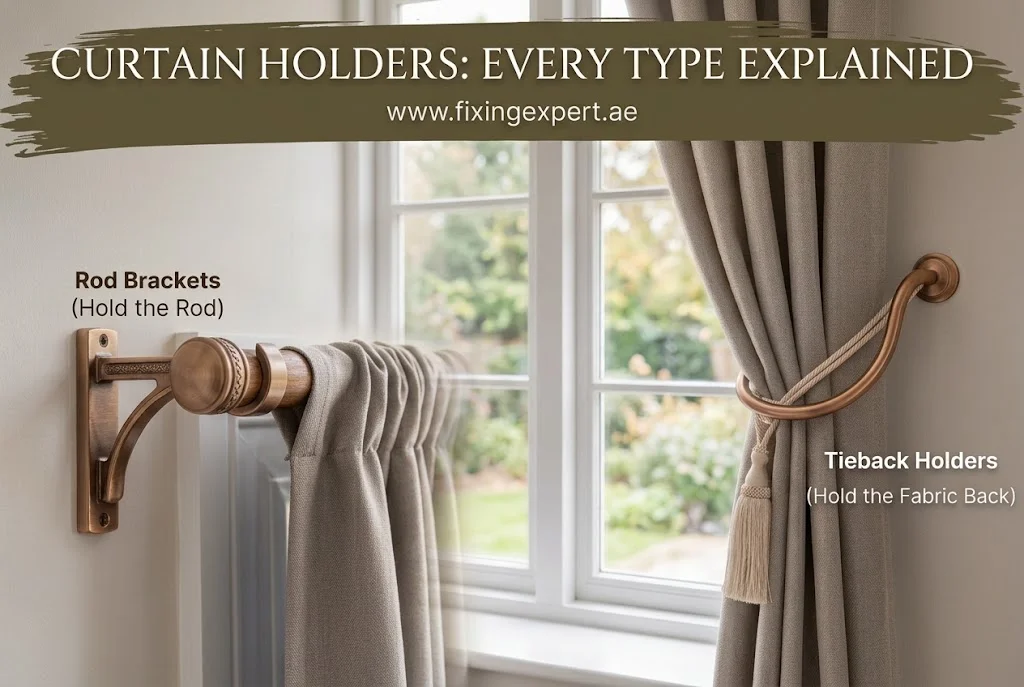
Curtain holder is a broad term, and it actually covers two completely different products. Confusing the two types is the main reason people end up with the wrong hardware.
One type mounts the rod to the wall and carries the full weight of the whole curtain system, while the other simply holds the fabric back once the curtain is already open and only ever deals with a small bunch of material.
A right type of curtain holder can mean a rod bracket, which mounts the curtain rod to the wall or ceiling and carries the full weight of the rod and fabric, or a tieback holder, which holds open curtain fabric to one side and only carries a small bunched section of material. Rod brackets need to be matched to fabric weight and properly anchored into the wall to avoid sagging. Tieback holders are lighter duty and mostly a styling choice. This guide covers both in detail, including how to pick, install, and repair each one.
What Is a Curtain Holder, Exactly?
The term gets used for two genuinely different products, and most search results blend them together without explaining the difference.
- Rod bracket holders: the hardware that attaches a curtain rod or track to the wall, window frame, or ceiling. This carries the full weight of the rod and every panel hanging on it.
- Tieback holders: the hardware that holds curtain fabric pulled back to one side, keeping the window open to light during the day. This only carries the weight of a bunched section of fabric.
Both fall under the same search term because both are hardware that holds part of a curtain system in place, but the buying decision, the weight involved, and the installation steps are different for each. This guide works through both, starting with rod brackets since they carry more structural responsibility.
In short, before shopping for a curtain holder, it helps to know if the job is holding the rod up or holding the open fabric back, since the two products aren’t interchangeable.
What Are the Main Types of Curtain Holders?
| Type | Category | What it does | Typical weight handled |
|---|---|---|---|
| Standard wall bracket | Rod bracket | Holds a rod to the wall beside the window | 15 to 30 lbs |
| Heavy-duty wall bracket | Rod bracket | Holds a rod carrying lined or blackout curtains | 30 to 50+ lbs |
| Center support bracket | Rod bracket | Stops long rods from bowing in the middle | Supplements end brackets |
| Ceiling mount bracket | Rod bracket | Holds a rod from the ceiling instead of the wall | 20 to 40 lbs |
| No drill or adhesive bracket | Rod bracket | Temporary, tool free rod mounting | 5 to 15 lbs |
| Hook or knob holdback | Tieback | Small wall mounted hook that fabric loops over | Light fabric bundle |
| Decorative arm holdback | Tieback | Curved metal arm that fabric rests against | Light to medium fabric bundle |
| Magnetic holdback | Tieback | Two magnetic discs that clip through the fabric | Light fabric bundle |
| Rope or tassel tieback | Rope or tassel tieback | Fabric or cord loop hung over a hook | Light fabric bundle |
Rod brackets are rated in the tens of pounds because they carry an entire curtain system, while tieback holders only handle a bunched handful of fabric, which is why the two categories look so different on paper. Homes leaning toward a sleeker, more minimal look sometimes skip the rod altogether and opt for track-based hanging systems instead, which shift the weight-bearing job from a bracket to a track but still need the same care with wall anchoring underneath.
What Are Rod Bracket Curtain Holders and Why Do They Matter?
A rod bracket is the hardware piece, usually called a bracket, support, or socket, that attaches to a wall, window frame, or ceiling and carries the rod. It’s the only part of the whole setup actually bearing weight. Rings and hooks connect fabric to the rod, and finials just decorate the ends, while the bracket is doing the structural work.
Most brackets share three parts: a base plate that screws or sticks to the wall, an arm that projects outward, and a cup or slot where the rod sits. Some brackets add a locking screw on top of the cup so the rod can’t be lifted out by accident, a detail that matters far more once pets or kids are pulling on curtains every day.
Anyone comparing rod styles before settling on hardware can look through the range of curtain rod designs available, since the finish and diameter chosen there directly affects what kind of bracket is needed next.
The rod bracket is the structural part of the whole curtain system, not a cosmetic extra, and it deserves as much attention as the fabric or the rod itself.
Why Do Rod Brackets Sag or Fail?
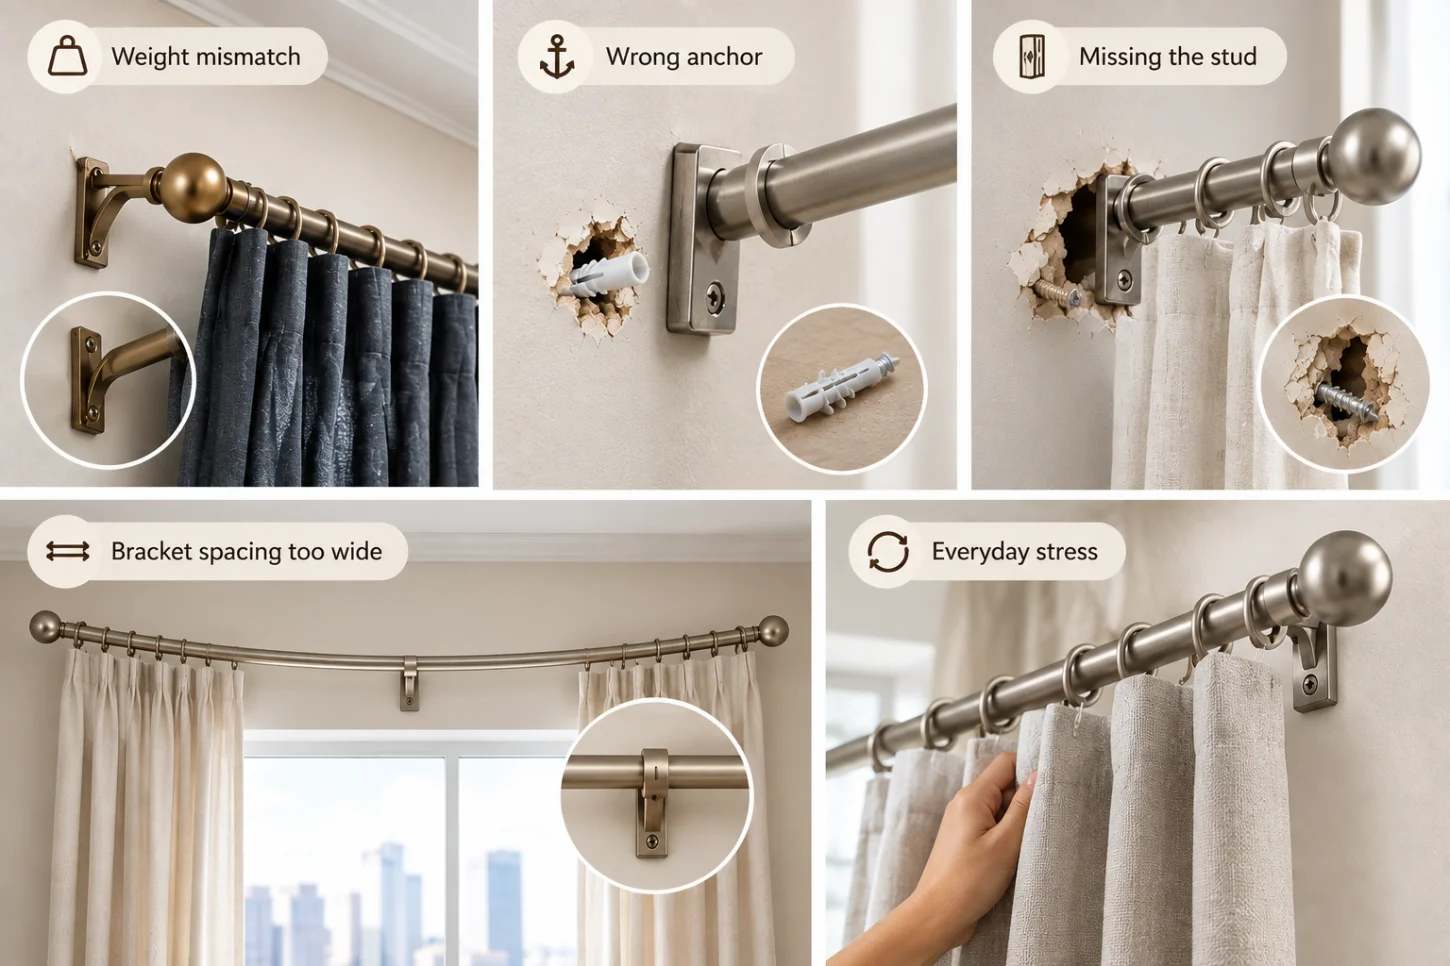
Only a handful of reasons a rod ever comes down, and almost none of them are bad luck.
- Weight mismatch:
A bracket rated for light voile ends up carrying lined blackout drapery instead. It doesn’t fail right away; it bends slowly week by week until it finally lets go. - Wrong anchor for the wall:
A plastic anchor meant for light picture frames is doing the job a metal toggle should be doing. Drywall and plaster have almost no strength on their own, so the anchor is what actually holds the screw in place. - Missing the stud:
A screw driven into plain drywall with no anchor at all will hold for a while and then pull straight out, sometimes taking a chunk of wall with it. - Bracket spacing too wide:
Long rods need a center support in the middle. Skip it, and the rod bows under its own weight before curtains are even added, then fails at the midpoint. - Everyday stress:
Curtains get pulled open and shut hundreds of times a year. Any weakness in the installation gets a little worse every time, which is why a rod that held fine for two years can suddenly give out overnight.
Almost every falling rod traces back to weight, anchor choice, stud location, spacing, or wear over time, and every one of those is preventable at the point of installation.
How Do You Choose the Right Rod Bracket for Your Curtains?
The fastest way to pick a rod bracket is to work backward from fabric weight rather than forward from looks.
| Curtain fabric | Approximate weight (per panel, standard window) | Recommended holder capacity |
|---|---|---|
| Sheer or voile | Under 2 lbs | 10 to 15 lbs |
| Cotton or linen | 2 to 4 lbs | 15 to 25 lbs |
| Velvet or lined drapery | 4 to 8 lbs | 25 to 40 lbs |
| Blackout lined or double layered | 6 to 10 lbs | 30 to 50 lbs |
| Motorized track systems | Varies by track length | Manufacturer specified, usually 40+ lbs |
A safe rule of thumb is to pick a bracket rated for at least double the actual curtain weight. That margin absorbs the extra force from opening and closing, plus any dust or humidity that adds weight to fabric over time. Anyone hanging thick velvet drapery or a fully lined, light blocking curtain should treat the heavy duty end of that table as the starting point rather than the exception, since these fabrics are heavier than they look folded up on a shelf.
In brief, match the bracket’s rated capacity to double the panel’s actual weight, and lean toward heavy-duty hardware for anything lined, layered, or blackout.
How Far Apart Should Rod Bracket Points Be Spaced?
Spacing is where a lot of installs quietly go wrong, because most people only think about the two end brackets and forget the middle.
| Rod diameter | Light curtains | Heavy curtains |
|---|---|---|
| Under 1 inch | Center support past 5 ft | Center support past 3.5 ft |
| 1 to 1.5 inches | Center support past 6 ft | Center support past 5 ft |
| Over 1.5 inches | Center support past 8 ft | Center support past 6 ft |
Thinner rods flex more, so they need support sooner even with light curtains. Thicker rods resist bowing better but still need a center bracket well before eight feet if the fabric is heavy. A simple test is worth remembering here. If a rod visibly bows while sitting empty on the brackets, it needs another support point, and that’s the rod showing what the spec sheet should have already said.
The thinner the rod or the heavier the fabric, the sooner a center bracket becomes necessary, and two end brackets should never be assumed enough past five feet.
How Do You Install Rod Brackets So They Never Fail?
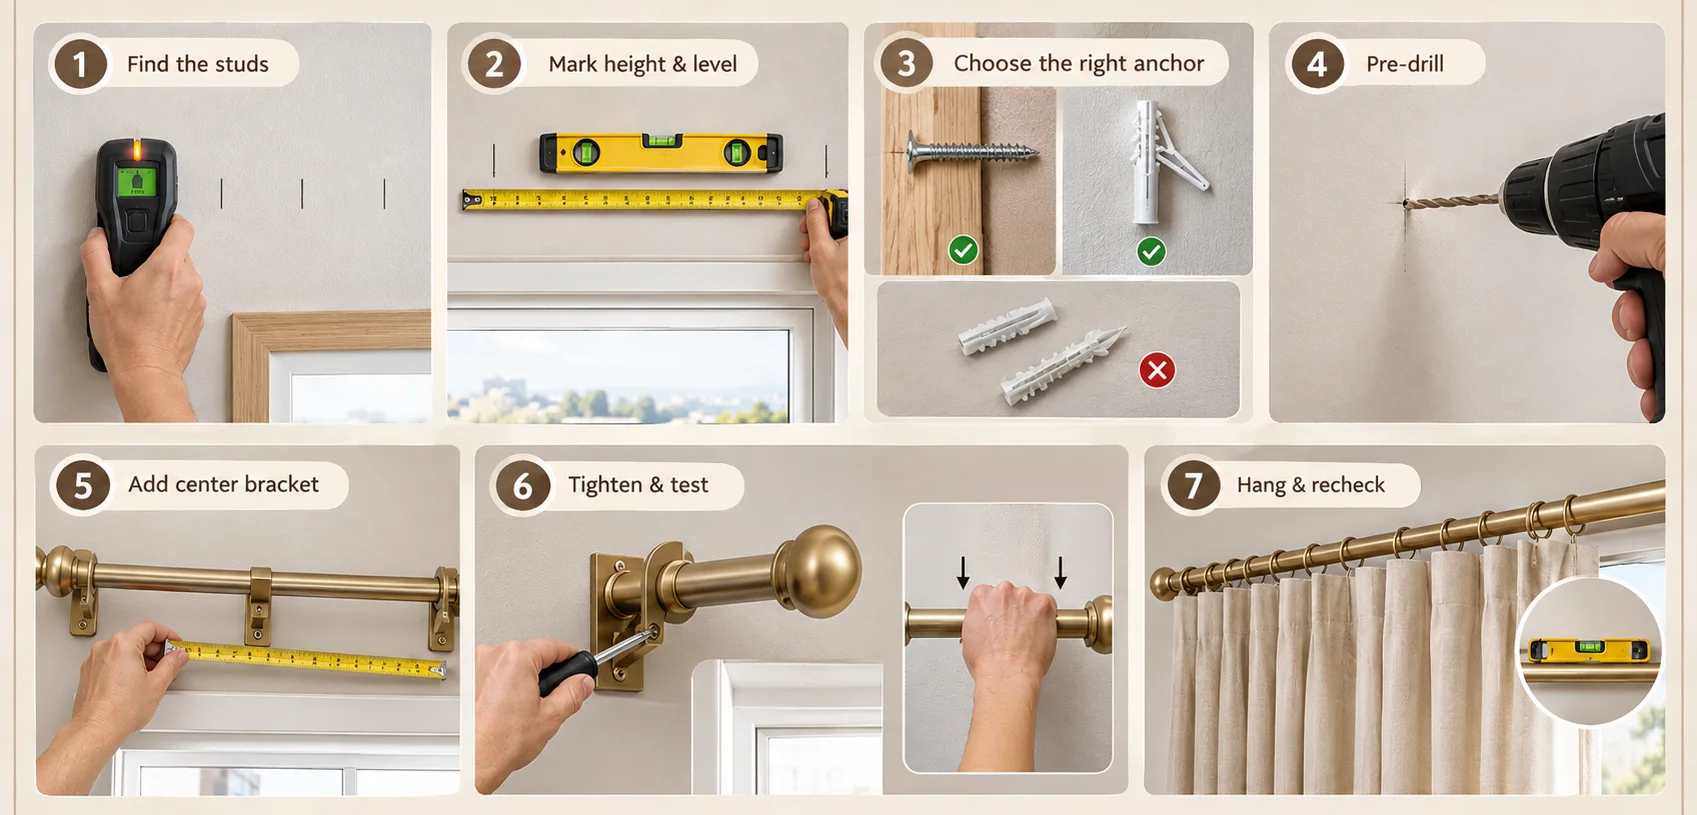
- Find the studs first. Run a stud finder across the wall above the window and mark every stud within reach of the bracket positions. A stud takes a direct wood screw with no anchor needed and will always outperform any anchor in plain drywall.
- Mark bracket height and level. Measure up from the window frame. For a taller looking room, brackets typically sit 4 to 6 inches above the frame, or closer to the ceiling for a dramatic effect. Use a level across both end positions before marking screw holes.
- Choose the right anchor for what’s behind the mark. On a stud, use a wood screw. On open drywall, use a self-drilling toggle or winged anchor rated for the bracket’s expected load, never the small plastic anchors that ship in the box with most hardware kits.
- Pre drill before driving anchors. A pilot hole slightly smaller than the anchor keeps drywall or plaster from cracking around the edges.
- Add the center bracket before hanging the rod, based on the spacing table above, so the rod is fully supported the moment fabric goes on it.
- Tighten fully, then test empty. Set the rod in the brackets without curtains first and apply firm downward pressure by hand. Any wobble here only gets worse under fabric weight.
- Hang the curtains and recheck level after a week. Fabric settles slightly in the first few days, so a quick recheck catches any early sag before it turns into a real problem.
A reliable install comes down to finding studs, leveling the marks, matching the anchor to what’s actually behind the wall, adding a center bracket where needed, and testing the empty rod before trusting it with curtains.
Does Wall Type Change How You Mount Rod Brackets?
Yes, the wall material behind the bracket often matters more than the bracket itself.
- Drywall: the most common surface and also the weakest on its own. Anything heavier than sheer curtains needs a toggle bolt or self drilling anchor rather than the standard plastic anchor.
- Plaster: older homes often have plaster over wood lath, which can crack if drilled too aggressively. A slower drill speed and a slightly longer screw reduce the risk and give a stronger hold.
- Tile or stone: around bathroom or kitchen windows, a masonry bit and a plastic sleeve anchor rated for tile are needed, since standard drywall anchors won’t grip a hard, non porous surface.
- Concrete or block walls: these need a hammer drill and concrete rated anchors. Slower to install, but once done, this is the strongest wall type for holding weight.
- Ceilings: always anchor into a joist or a rated toggle, since ceiling drywall carries even less weight than wall drywall.
Studs and solid framing beat any anchor, and where there’s no framing, the anchor type should match the wall material: toggle for drywall, longer screws for plaster, masonry anchors for tile, and concrete rated anchors for block or concrete.
What Are Curtain Tieback Holders and How Do They Work?
A tieback holder does a completely different job from a rod bracket. Instead of holding the rod up, it holds the open curtain fabric back against the wall so light and airflow aren’t blocked during the day. It mounts at roughly tieback height, usually around a third of the way down from the rod, rather than up near the window frame.
Because a tieback only ever carries a bunched handful of fabric rather than an entire panel, the hardware is lighter duty by design. The trade-off is that it sits lower on the wall, often somewhere it gets brushed or bumped more often, so a secure fixing still matters even though the load is small.
A tieback holder manages an open curtain’s appearance and light flow, carrying only a bunched section of fabric rather than the full weight a rod bracket has to support.
What Types of Curtain Tieback Holders Are There?
 Hook or knob holdback
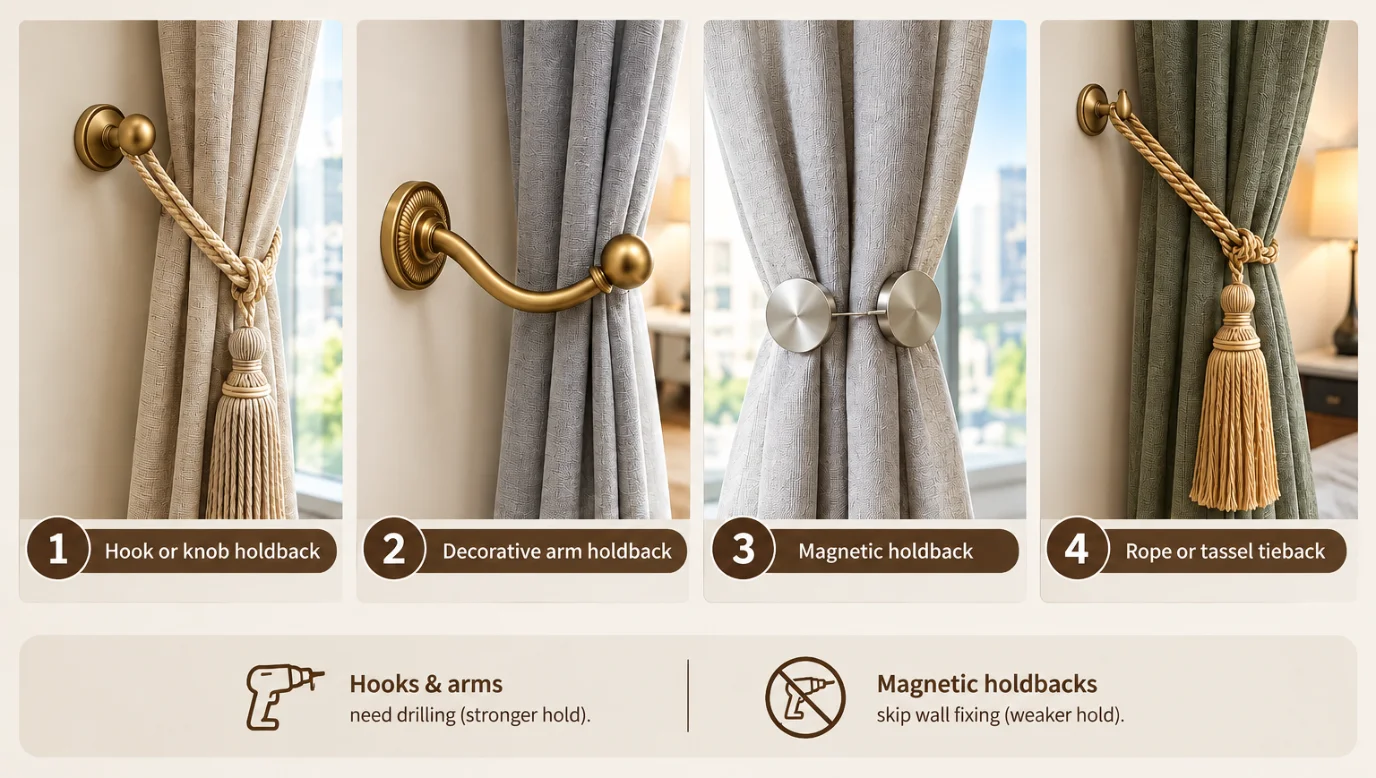
A simple wall mounted hook or ball shaped knob that a fabric loop or tassel tieback hangs over. Cheapest and easiest to install, purely functional unless a decorative knob is chosen.
Decorative arm holdback
A curved metal arm projecting from the wall that the curtain rests against directly, with no separate fabric loop needed. These double as a design detail and show up often in more formal rooms.
Magnetic holdback
Two magnetic discs, one on each side of the fabric, that clip together through the curtain with no hardware touching the wall at all. No drilling required, though the hold only lasts as long as the magnet strength, so heavier fabric can slip free over time.
Rope or tassel tieback
A decorative cord or tasseled rope that loops around the curtain and hangs over a small wall hook. The tieback itself is the decorative piece here, though a hook is still needed to anchor it.
Hooks and arms need drilling but hold more reliably, while magnetic holdbacks skip the wall fixing entirely at the cost of a weaker, fabric dependent hold.
How Do You Choose and Install a Curtain Tieback Holder?
- Match the style to the room, since unlike rod brackets, tiebacks are mostly a visual decision. A decorative arm suits a formal living room, while a simple hook works fine in a bedroom or kids’ room.
- Pick the mounting height before drilling. A common starting point is roughly a third of the way down from the rod to the floor, though this shifts depending on curtain length and how far back the fabric needs to sit. Bedroom windows in particular tend to keep tiebacks lower for a softer, more relaxed drape.
- Check the wall behind the mark, the same way as for rod brackets. A stud or proper anchor is still worth using for a hook or arm holdback, even though the load is lighter, since these get bumped against more often than a rod bracket does.
- Test with the curtain in place before fully tightening, since tieback height is one of those details that’s much easier to judge once fabric is actually resting against it.
Tieback holders are chosen mostly by look and mounting height, but the wall fixing basics from rod brackets still apply, just at a smaller scale.
A tieback holder is also one of the few curtain hardware decisions that can be changed later without touching the rod at all. Swapping a hook for a decorative arm, or moving the height by a couple of inches, doesn’t affect the rod bracket setup above it in any way. That makes it a reasonable place to experiment with a room’s look before committing to anything more structural, since rod bracket choices are far more disruptive to redo once curtains are already hanging and the wall has already been drilled and patched once. Curtain hooks themselves come in a few different styles worth knowing about too, particularly for anyone hanging a tieback loop that isn’t sewn directly into the fabric.
What Are the Most Common Curtain Holder Mistakes?
- Using the anchors that came in the box without checking their weight rating against the actual curtain weight.
- Skipping the center bracket on rods over five or six feet because the two end brackets look like enough.
- Confusing a tieback holder with a rod bracket and expecting light duty hardware to carry an entire curtain system.
- Mounting a tieback too high or too low, which changes how much light the window actually gets once the curtain is pulled open.
- Ignoring wall type and using the same drywall anchor for tile, plaster, or concrete.
- Not testing the empty rod before hanging curtains, so any wobble only gets discovered once fabric is already in place.
- Forgetting dynamic load. A curtain being pulled shut adds a sideways yank on top of its static weight, something static weight ratings don’t always account for.
Most failures are avoidable mistakes made in the first ten minutes of installation, not hardware defects that show up later.
How Do You Fix a Curtain Holder That’s Already Failing or Loose?
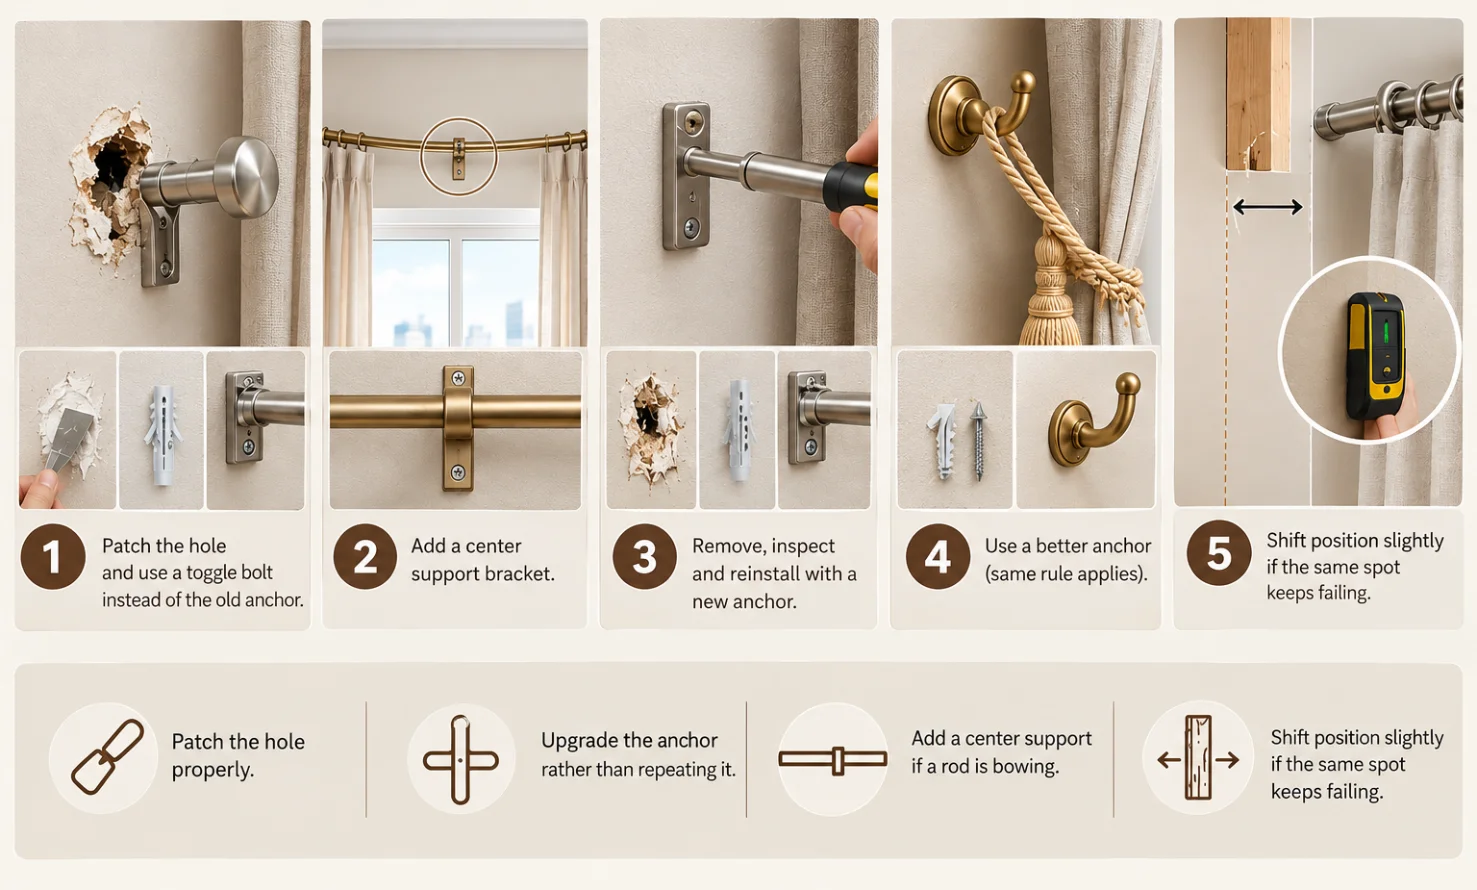
1. A rod bracket pulled out of drywall
Fill the old hole with a wall repair compound or a toggle anchor patch kit, let it cure fully, then reinstall using a properly rated toggle bolt rather than the original anchor. Reusing the same hole with the same anchor type almost always fails again within weeks.
2. A rod that’s visibly bowing but brackets are intact
the fix is almost always a center support bracket rather than stronger end brackets.
3. A rod bracket that’s loose but not out
Remove it, inspect the anchor, and if there’s any visible crumbling around the hole, treat it as a failed anchor and repair before reinstalling.
4. A tieback holder that’s pulled loose
Since the load is lighter, a simple anchor upgrade usually solves it, though the same rule applies: don’t reuse a failed hole with the same anchor type.
5. Repeated failures in the same spot
Check whether that section of wall has a stud nearby that can be used instead, shifting the position by an inch or two rather than fighting the same weak spot again.
Patch the hole properly, upgrade the anchor rather than repeating it, add a center support if a rod is bowing, and shift position slightly if the same spot keeps failing.
What Are the Most Common Curtain Holder Installation Mistakes?
Tieback holders and standard rod brackets on light to medium curtains are a reasonable job for anyone comfortable with a drill and a stud finder. Professional help is worth it for heavy or motorized drapery, ceiling mounts, plaster or concrete walls, and bay or oversized windows where several brackets need to line up perfectly. Getting bracket placement wrong on a motorized curtain track, or on a large custom made drapery setup, is far more costly to redo than getting it wrong on a light cafe curtain, and situations like these are usually where a proper fitting and installation service earns its cost.
Frequently Asked Questions
Is a curtain holder the same thing as a curtain rod bracket?
Not always. Curtain holder gets used for both rod mounting brackets and tieback holdbacks, and these are two different products. A bracket holds the rod itself to the wall, while a holdback holds the open curtain fabric to one side, so it’s worth checking which one a listing or search result is actually describing before buying anything.
What’s the maximum weight a curtain holder can carry?
For rod brackets, standard residential versions typically range from 15 to 30 lbs, with heavy duty versions going up to 50 lbs or more. Tieback holders sit in a different category entirely and only need to manage a bunched handful of fabric, so their weight ratings aren’t really comparable to a bracket’s.
Can curtain holders be installed without drilling into the wall?
Yes, through adhesive rod brackets, tension rod cups, or magnetic tiebacks, but these top out at a lower weight capacity and lose grip faster in humid rooms or with temperature swings near windows. They suit a rental or a very light curtain, not a long term solution for anything heavier.
How high should a tieback holder be mounted?
A common starting point is roughly a third of the way down from the rod, though the right height depends on curtain length and how far back the fabric needs to sit before it looks proportional to the window. Testing with the curtain in place before final tightening avoids having to redrill later.
Why did my curtain rod suddenly fall after working fine for years?
Repeated stress from daily opening and closing gradually weakens screws and anchors, even ones installed correctly at first. Add in dust and humidity slowly adding weight to fabric over time, and a bracket that was borderline from day one eventually crosses the line. It’s rarely sudden damage, more often just slow wear finally catching up.
Do heavier curtains always need a center support bracket?
Not always, but they need one much sooner than light curtains do. A rod under five feet carrying lightweight sheers may be fine with just two end brackets, while the same length carrying lined or blackout fabric often already needs a middle support.
Should a curtain holder match the curtain rod’s finish?
This is purely a style choice with no effect on strength. Matching finishes create a cleaner look, while mixing metals is a common intentional design choice in more eclectic rooms. The finish has no bearing on weight capacity for either a bracket or a tieback holder.