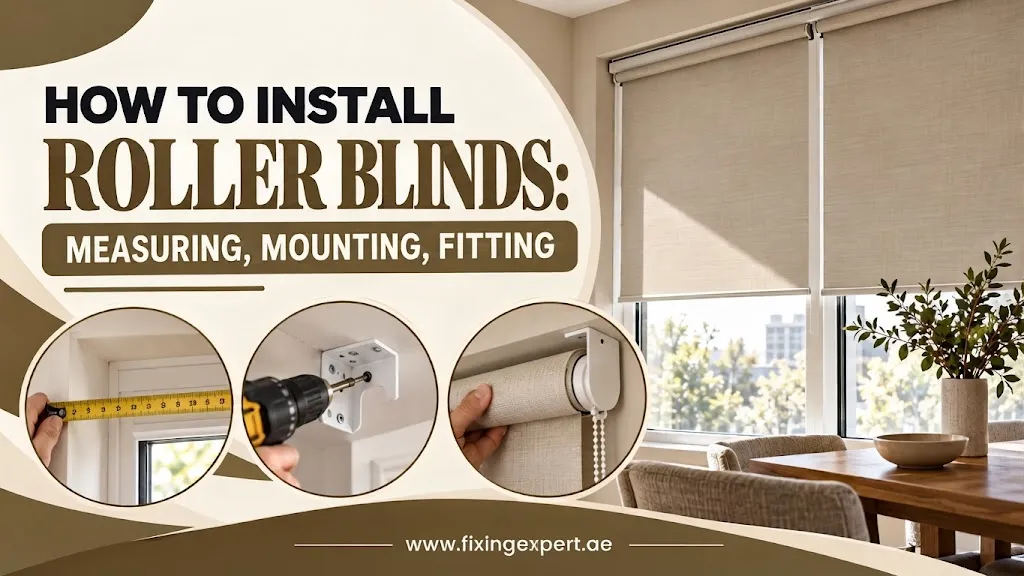
A roller blind that looks crooked, rubs the frame, or does not roll smoothly almost never fails because of the blind itself. It fails because of a small mistake made before the blind was even hung. Get the mount type right, measure in the right spots, and fix the bracket level, and the blind will work well from day one. The steps below suit most standard roller blinds, whatever fabric they use.
Pick inside mount or outside mount first, because this changes every measurement after it. Measure width and drop in different places and use the smallest number for an inside mount. Mark the brackets level and add a center bracket on a wide blind. Finish with a cord safety clip, since this is the step people forget most. We are discussing details here .
CHOOSING THE RIGHT ROLLER BLIND FIRST
The hardware is the same for most roller blinds. The fabric and the housing change what the blind does in the room, so decide these before you measure.
CASSETTE OR OPEN ROLL
A cassette blind has a small box at the top that hides the rolled fabric. It looks neat and blocks a little more light at the top edge. An open roll blind leaves the rolled fabric on show. It usually costs less, but it leaves a small gap at the top.
BLACKOUT OR LIGHT FILTERING FABRIC
Blackout fabric blocks almost all light. It suits a bedroom or a media room. Light filtering fabric, sometimes called sunscreen fabric, lets some daylight in and cuts glare. It suits a living room better than full darkness.
DOUBLE ROLLER BLINDS
A double roller blind holds two rolls of fabric on one set of brackets. Many people use a sheer layer and a blackout layer together. Each layer moves on its own, so you get more choice than with a single roll.
RECESS ONLY BLINDS
Some slim or cordless blinds are made for inside mounting only. They cannot be used as an outside mount. Check this before you measure, so you do not work out an outside mount for a blind that was never made for it.
Pick the housing and the fabric first. Then check the maker’s notes on mounting before you take any measurements.
13 Tested Steps Of Installing Roller Blinds
Follow these steps in order. Doing them in a different order is how most jobs go wrong. Each step builds on the one before it.
STEP 1: GATHER THE TOOLS
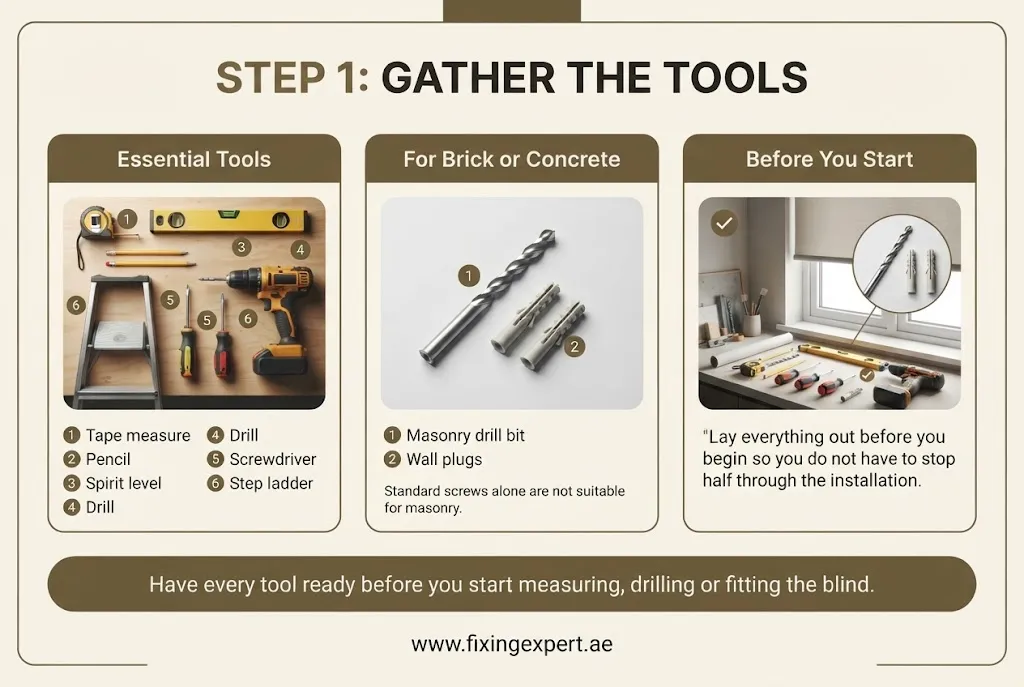 You need a tape measure, a pencil, a spirit level, a drill, a screwdriver and a step ladder. For a brick or concrete wall, add a masonry drill bit and wall plugs. The screws that come in the box will not hold in brick on their own.
Lay everything out before you start. It is annoying to stop halfway up the ladder because you cannot find the right drill bit.
STEP 2: CHOOSE INSIDE OR OUTSIDE MOUNT
An inside mount puts the blind inside the window recess, flush with the wall. It looks neat and built in. The recess must be deep enough for the bracket and the roller tube, or the blind will hit the window handle.
An outside mount fixes the blind to the wall or frame above the window, so it hangs in front of the glass. It works even when there is no recess. It also blocks more light at the edges, because the blind can be wider than the window.
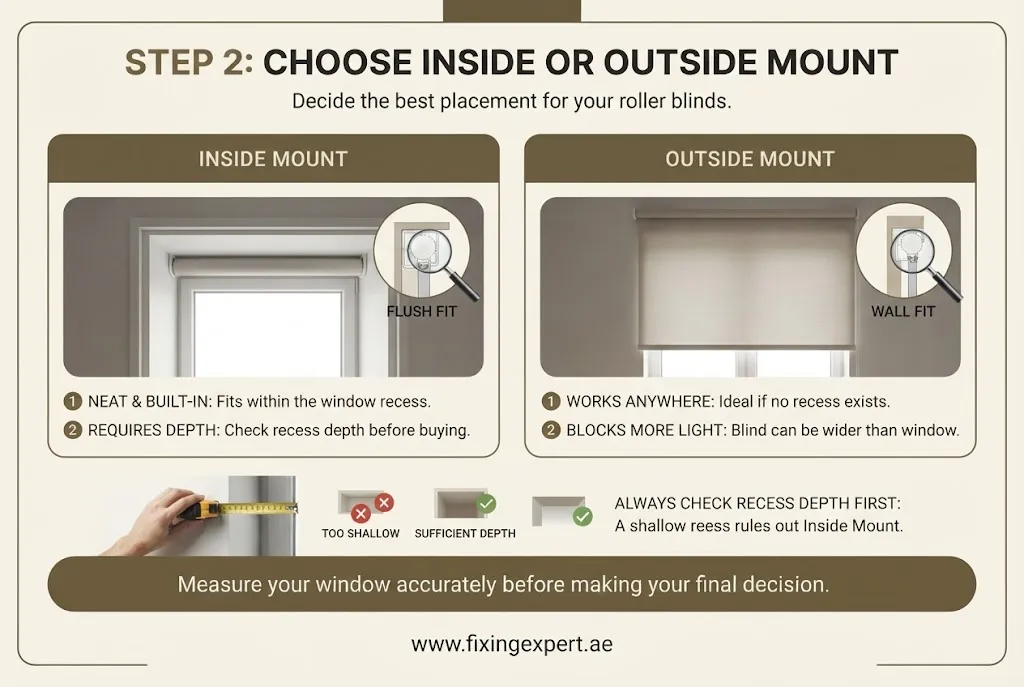
Check the recess depth with a tape measure first, even if you prefer an inside mount. A recess that is too shallow rules it out straight away.
| FACTOR | INSIDE MOUNT | OUTSIDE MOUNT |
| Look | Neat, sits inside the recess | Blind sits on the wall and frames the window |
| Recess depth needed | Yes | No |
| Light blocked at the edges | Only within the recess width | Better, can cover beyond the glass |
| Works with no recess | No | Yes |
| Room for measuring mistakes | Small | Bigger |
STEP 3: MEASURE THE WINDOW
This step matters most. If the measurements are wrong, the blind will not sit properly, however carefully you fit it.
MEASURING FOR AN INSIDE MOUNT
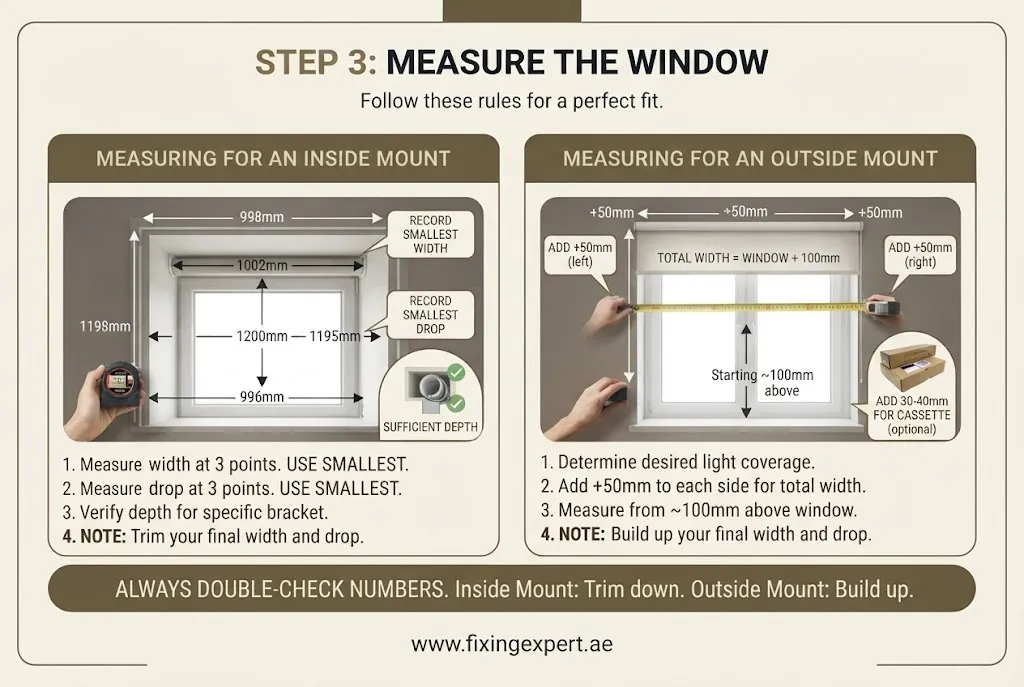
- Measure the width at the top, the middle and the bottom of the recess.
- Write down all three numbers and use the smallest one. Do not use the average.
- Measure the drop on the left, in the center and on the right, from the top of the opening down to the sill.
- Use the smallest drop number too.
- Check that the recess is deep enough for the bracket and the roller tube to sit without catching on anything.
MEASURING FOR AN OUTSIDE MOUNT
- Measure the full width you want to cover.
- Add about 100mm in total, which is 50mm on each side, so no light slips through at the edges.
- For the drop, measure from the spot where the top bracket will be fixed down to where the blind should stop. That spot is usually about 100mm above the window, so the brackets have a solid wall to hold on to.
- If the blind has a cassette, add another 30 to 40mm to the drop for the box.
EXAMPLE
Say the recess reads 998mm at the top, 1002mm in the middle and 996mm at the bottom. Use 996mm, the smallest number. Say the drop reads 1198mm, 1200mm and 1195mm. Use 1195mm. If you order the bigger numbers, the blind may not fit the tightest part of the recess.
The two mounts work in opposite ways. For an inside mount you trim the numbers down to the tightest point. For an outside mount you build the numbers up from the window size. People who measure one window each way often mix this up, so say the rule out loud before you start each window.
STEP 4: CHOOSE THE CONTROL SIDE
A roller blind opens and closes with a chain on one side. Decide which side that is before you drill. Pick the side that is away from furniture and busy walkways. Changing it later usually means new holes in the wall.
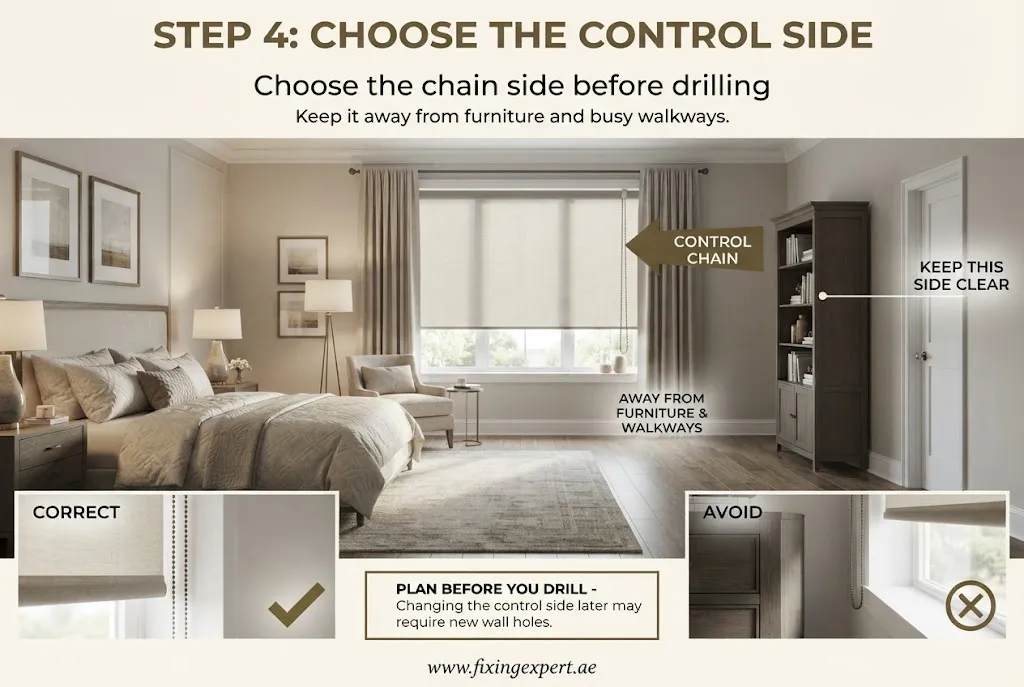
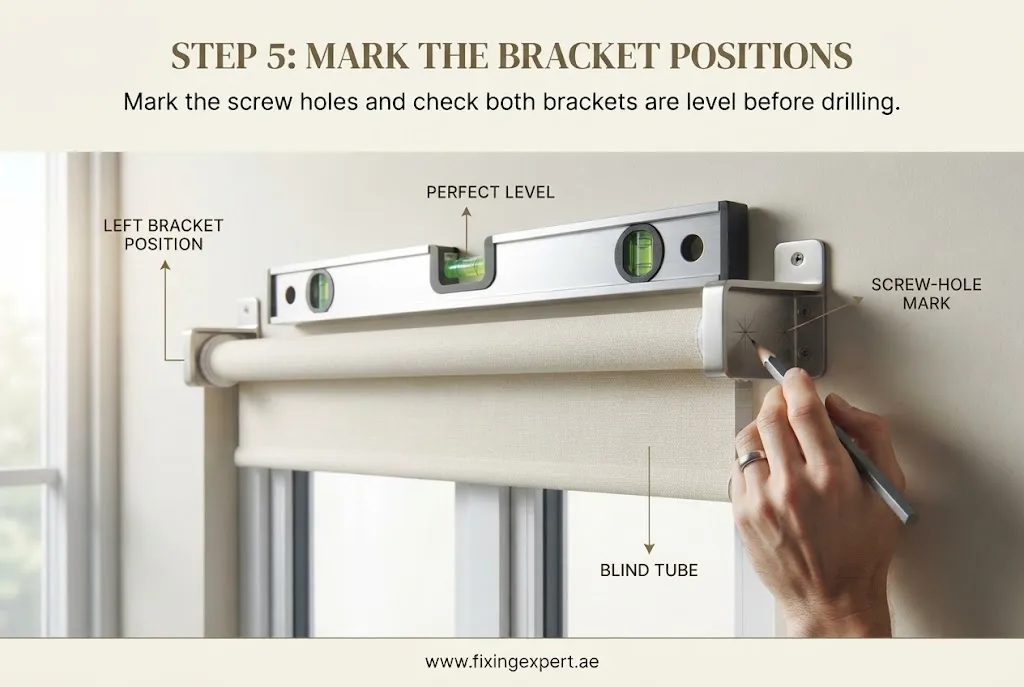
STEP 5: MARK THE BRACKET POSITIONS
Hold the first bracket where it needs to go and mark the screw holes with a pencil. Do the same for the second bracket on the other side. Put the spirit level across both marks before you drill. Even a small tilt shows up as a crooked blind once the fabric hangs.
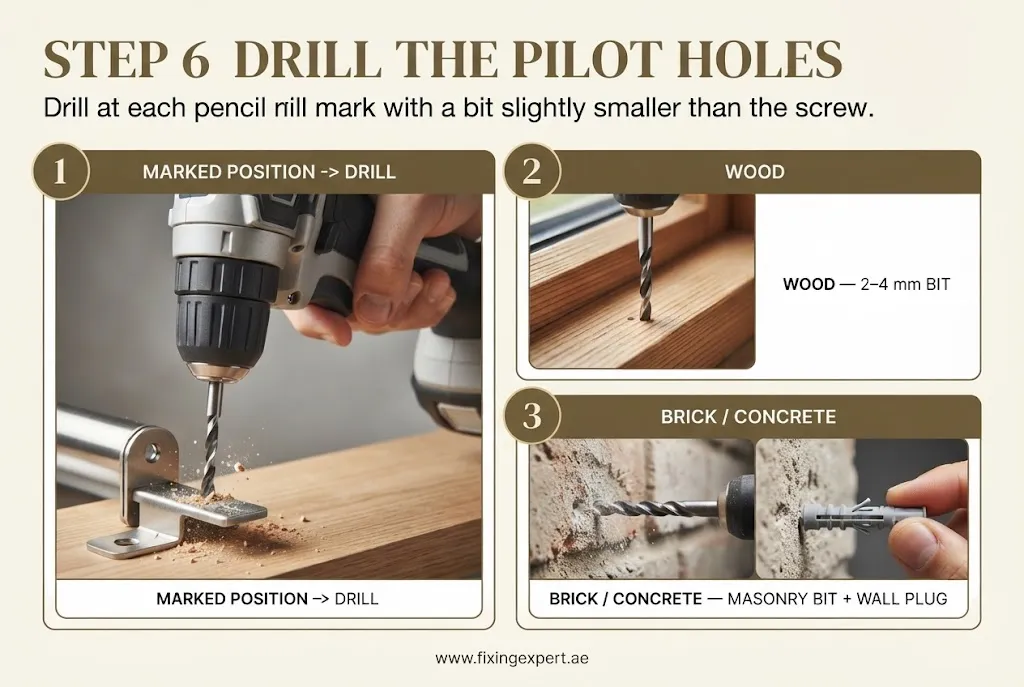
STEP 6: DRILL THE PILOT HOLES
Drill at each pencil mark with a bit a little smaller than the screw. Wood takes a small bit, about 2 to 4mm. Brick or concrete needs a masonry bit and a wall plug for a firm hold. Push the plug in until it sits flush with the wall.
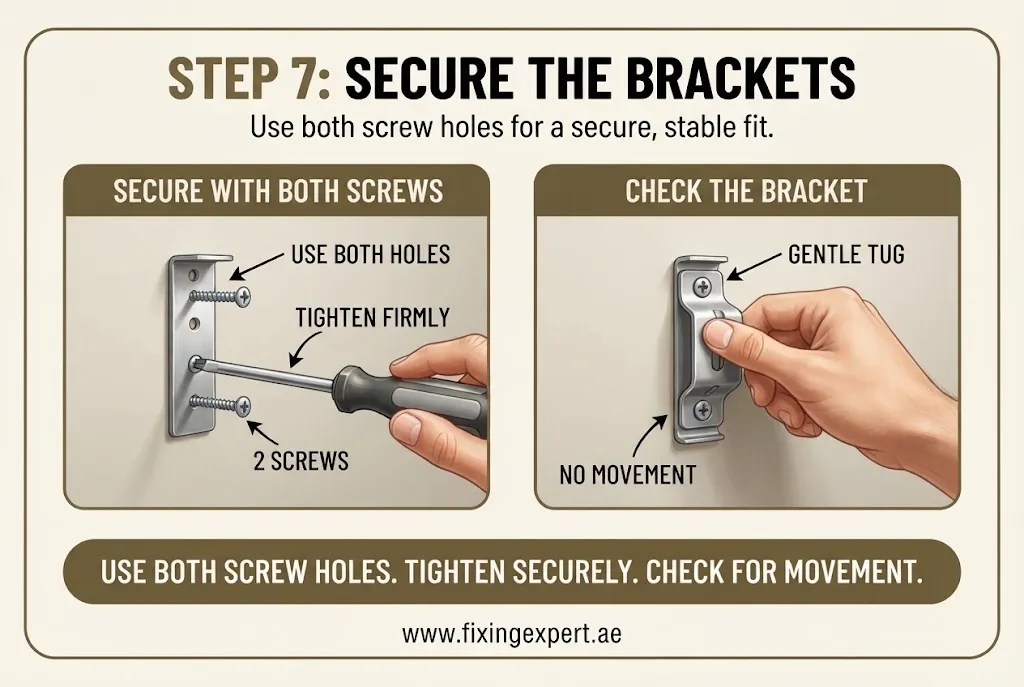
STEP 7: SECURE THE BRACKETS
Screw each bracket tightly using both screw holes, not just one. A bracket held by one screw can twist a little over time under the weight of the blind. Give each bracket a gentle tug to check it does not move.
STEP 8: ADD A CENTER BRACKET ON WIDE BLINDS
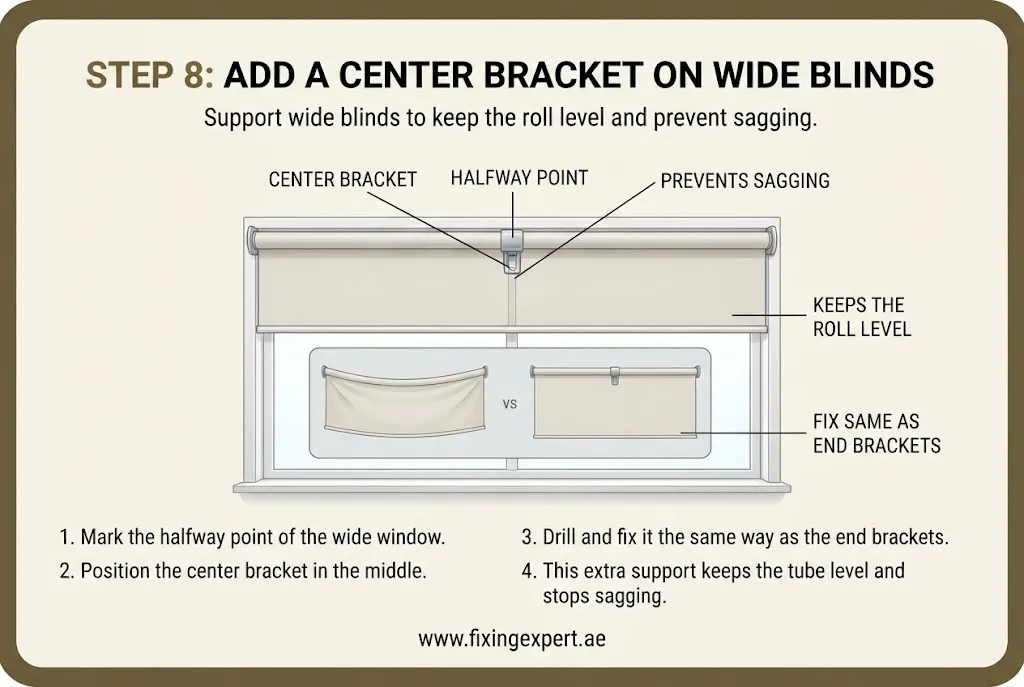
A wide blind has a long tube that holds a lot of fabric. With no support in the middle, the tube can bend and sag. Add a third bracket at the halfway point on any wide window. This keeps the roll level and stops it sagging. Mark it, drill it and fix it the same way as the two end brackets.
STEP 9: CHECK THE LENGTH AND TRIM IF NEEDED
Most blinds are made to size and need no cutting. Some arrive a little too wide. Check the maker’s instructions first, because the right cut depends on the blind.
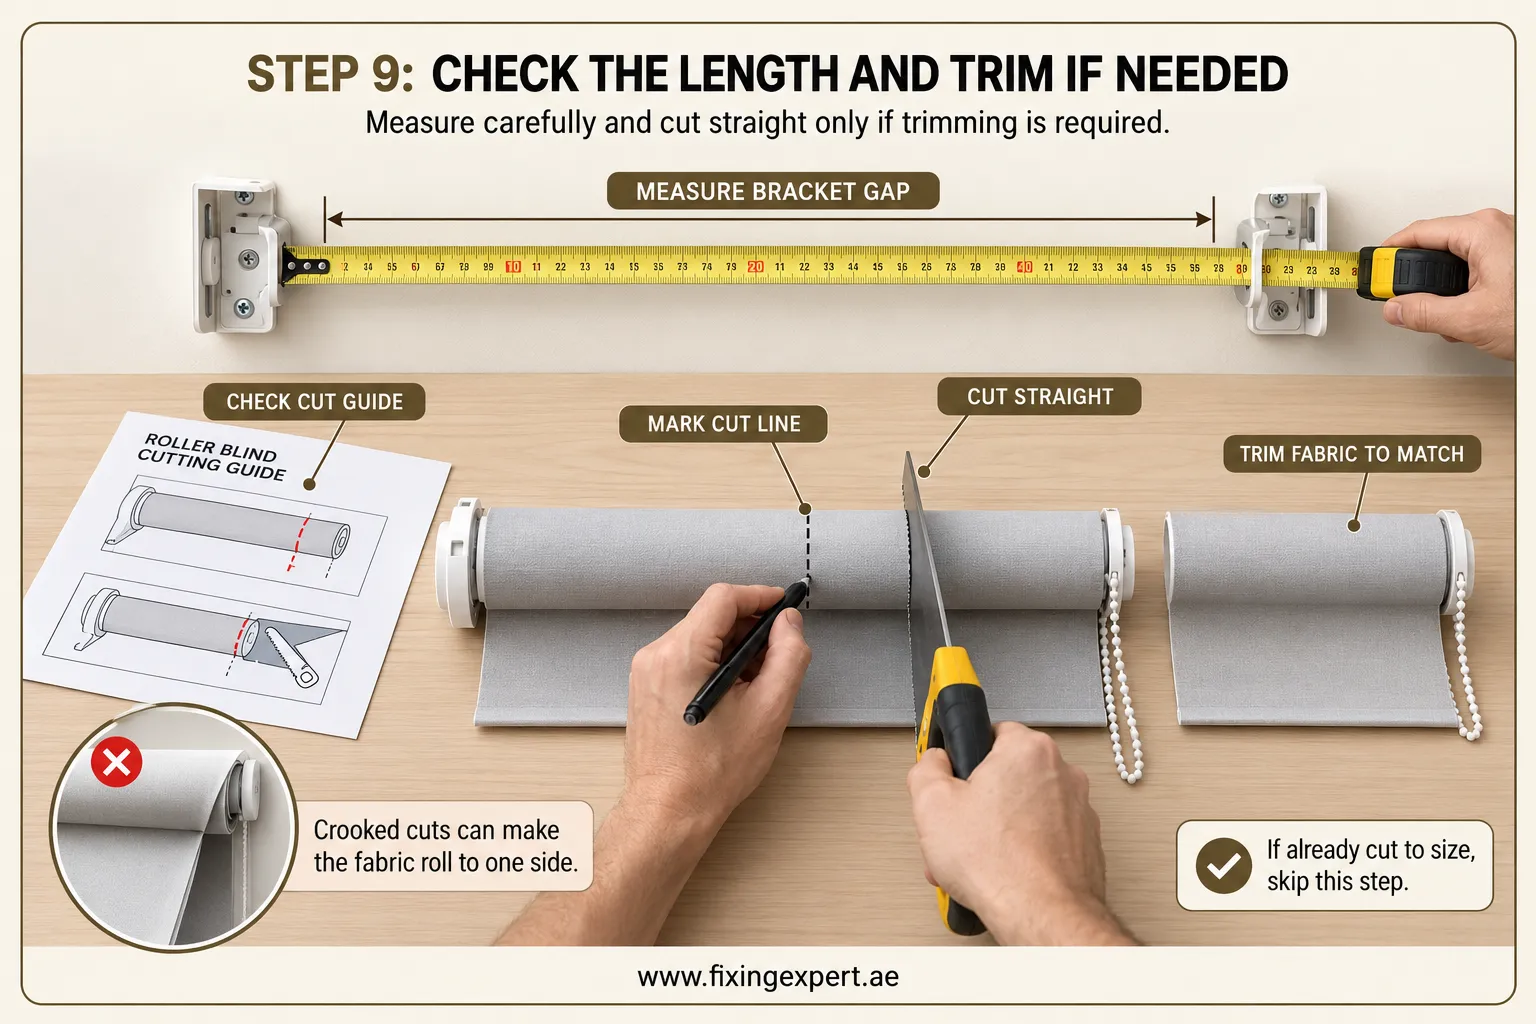
- Measure the gap between the two end brackets.
- The finished blind, with its end cap and chain end, must be a little shorter than that gap so it can slide into place.
- Use the maker’s cut guide to see how much shorter it should be.
- Mark the cut line and cut straight across.
- Trim the fabric to match.
A crooked cut makes the fabric roll to one side from the very first use. If your blind came cut to size, skip this step.
STEP 10: FIT THE ROLLER TUBE INTO THE BRACKETS
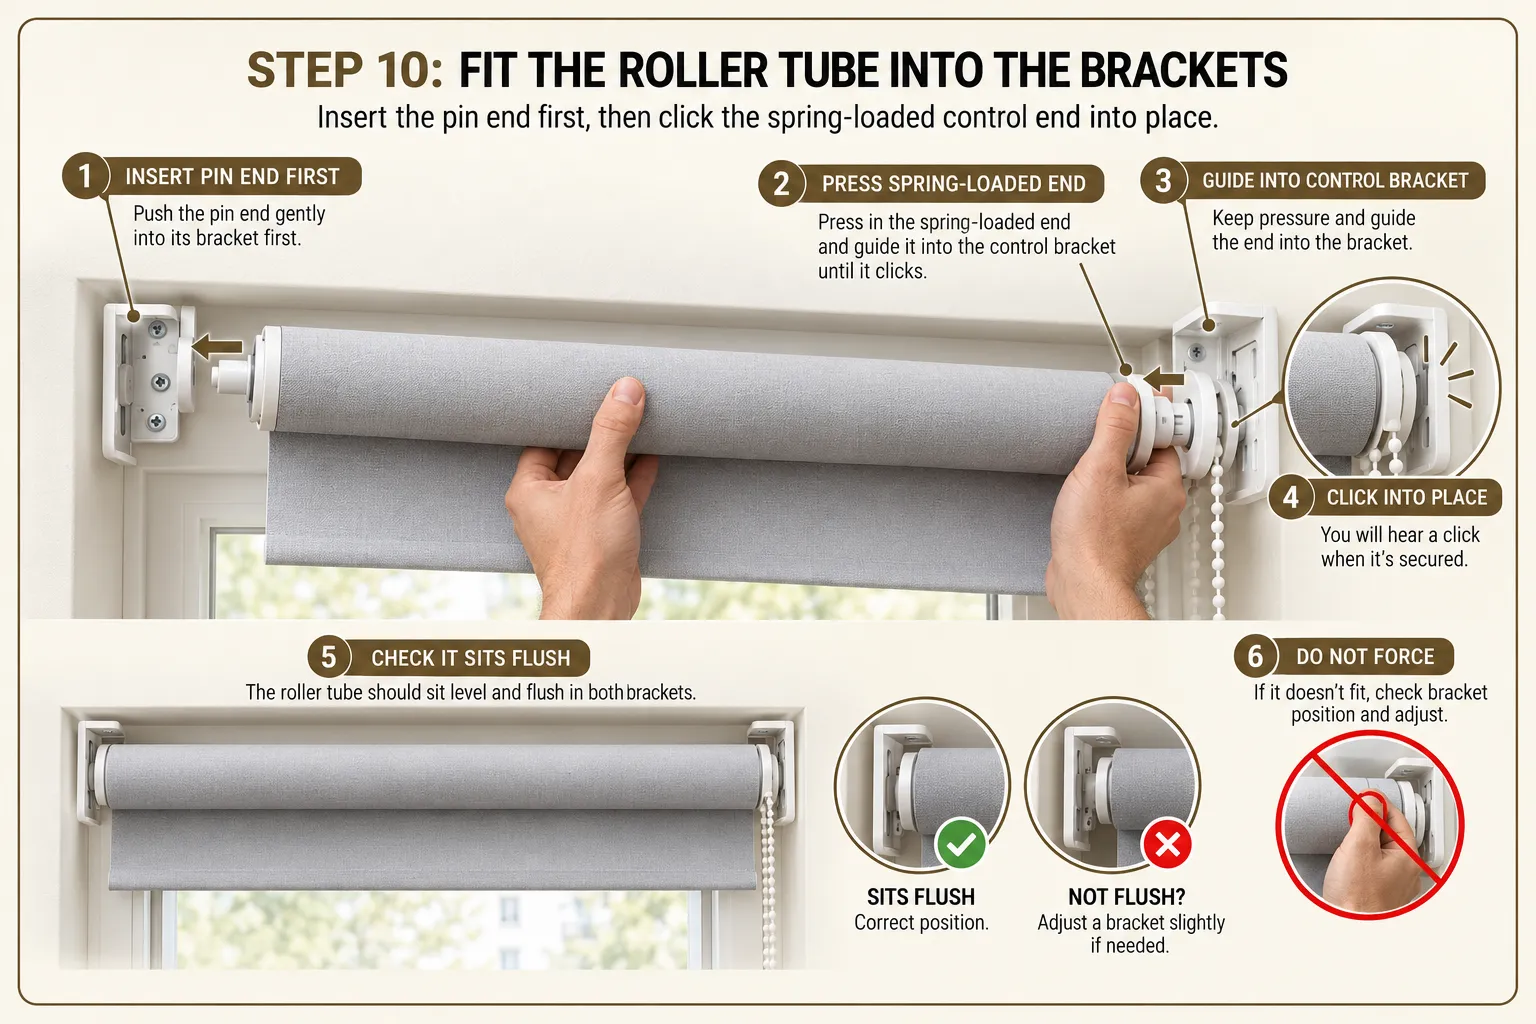
Most blinds have a round pin at one end and a spring loaded control end at the other. Push the pin end gently into its bracket first. Then press in the spring loaded end and guide it into the control bracket until you hear a click. If it will not sit flush, check whether one bracket needs to move a little. Do not force it.
STEP 11: CLIP ON THE BRACKET COVERS
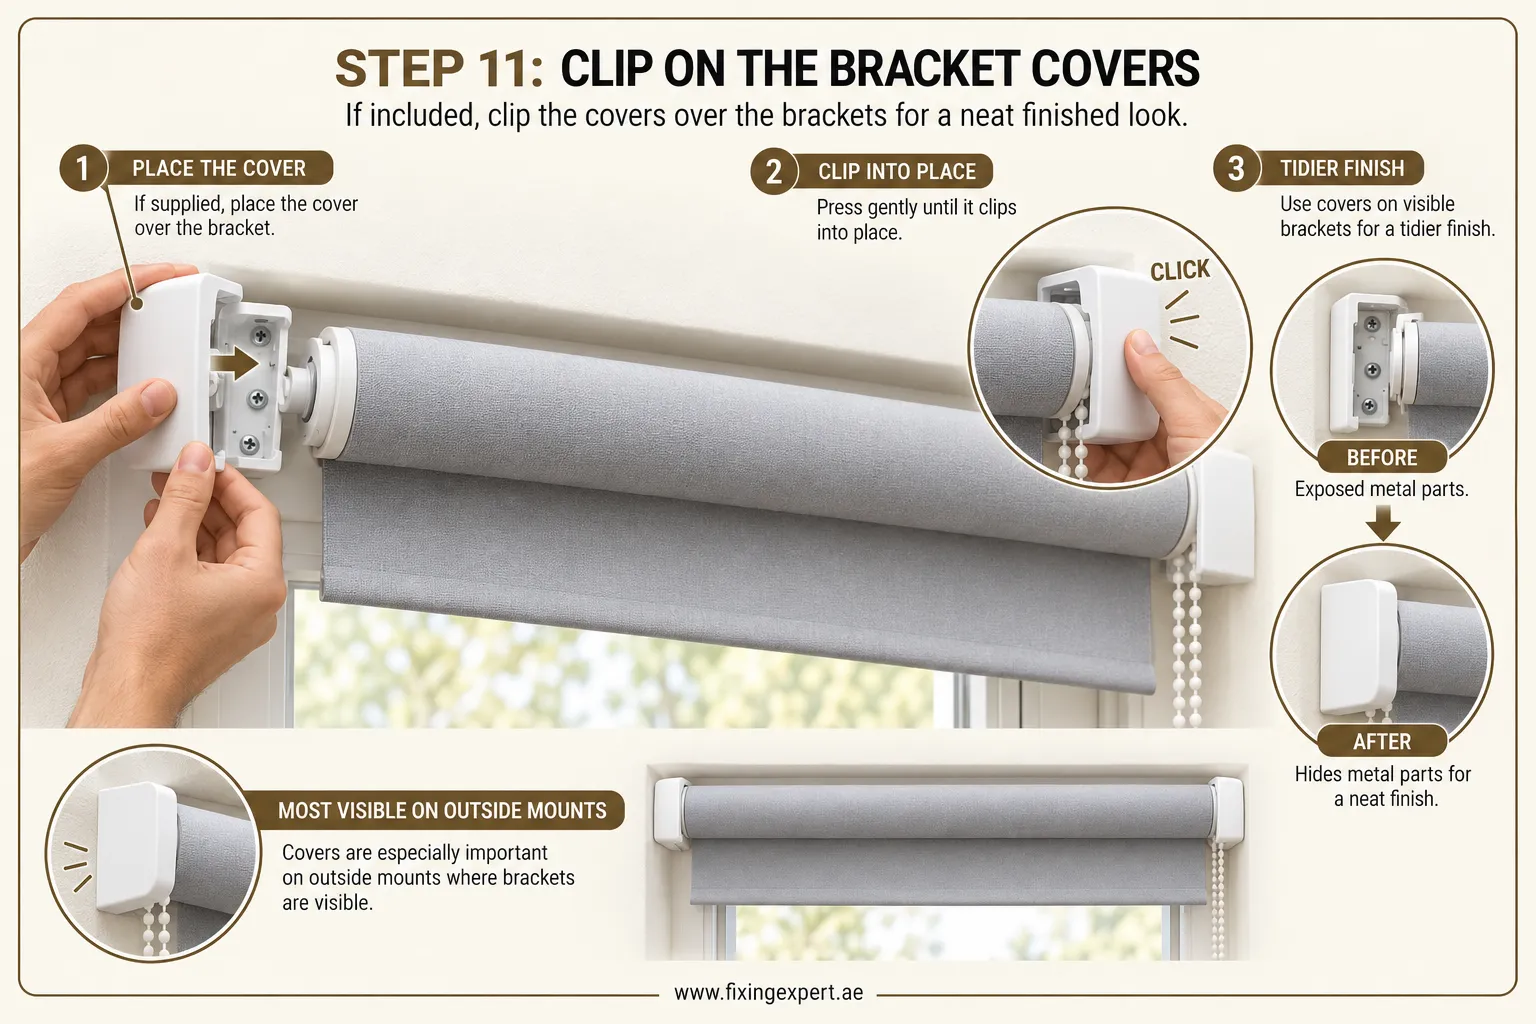
If the blind came with bracket covers, clip them over the metal parts now. This makes the job look tidy. It matters most on an outside mount, where the brackets are easy to see.
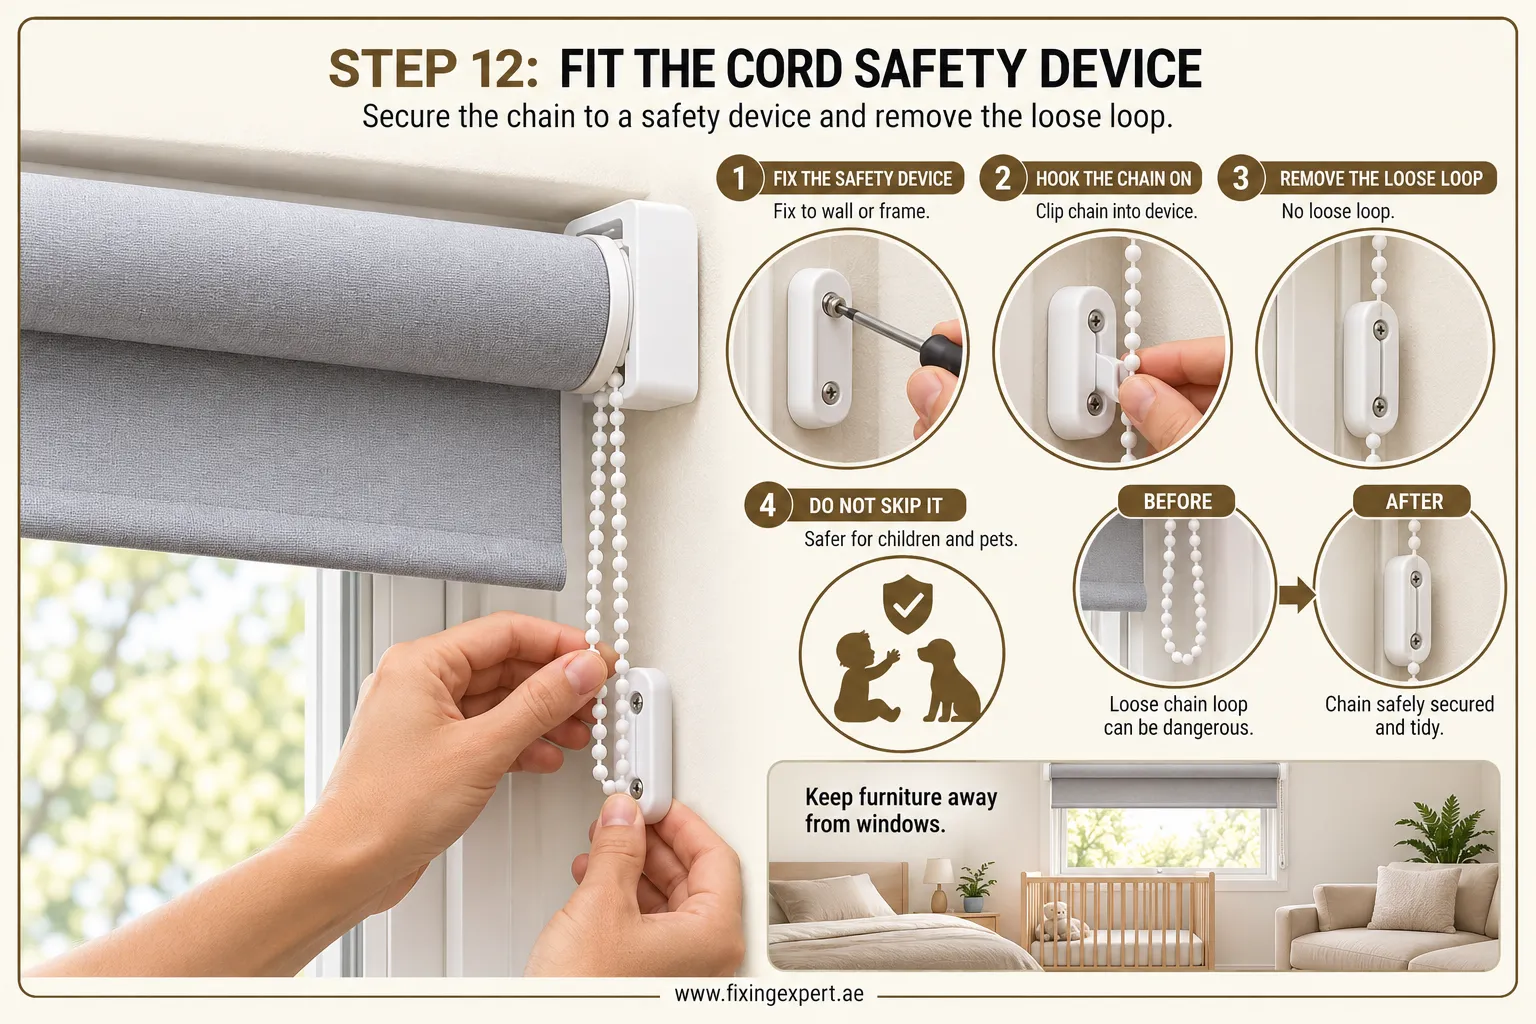
STEP 12: FIT THE CORD SAFETY DEVICE
Fix a cord tensioner or safety clip to the wall or frame and hook the loose end of the chain onto it. This removes the loose loop that can be dangerous for young children and pets. It takes a couple of minutes. Do not skip it. Keep beds, cots and sofas away from the window as well, so a child cannot climb up to the cord.
STEP 13: TEST THE BLIND
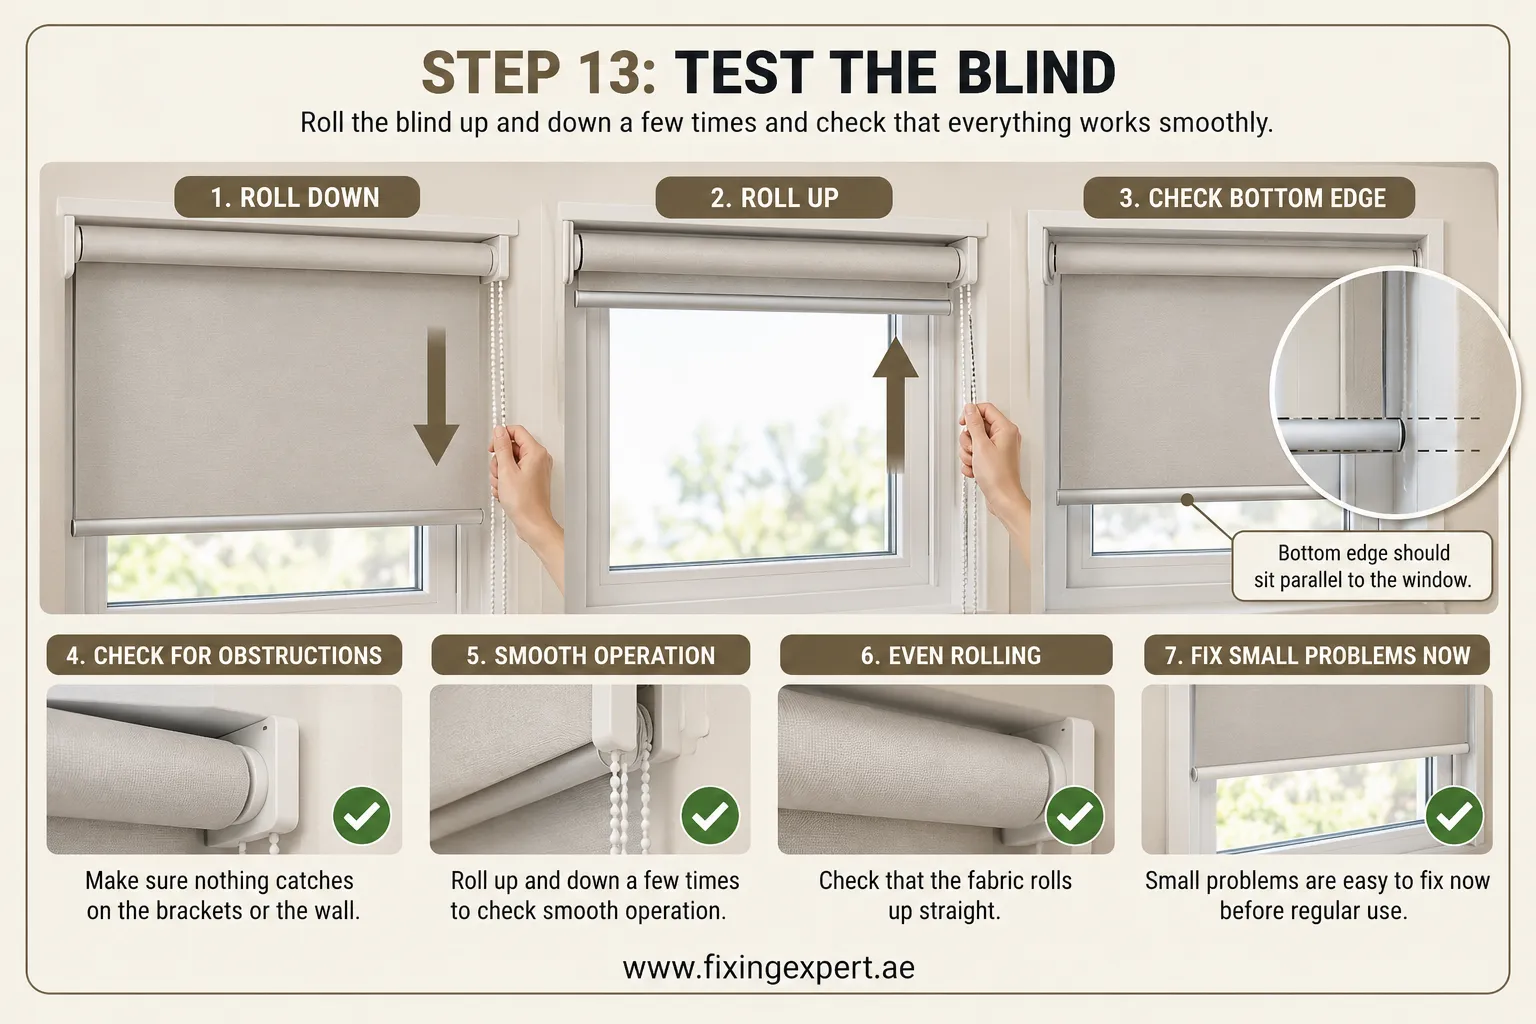
Roll the blind up and down a few times. Check that the bottom edge sits parallel to the window. Check that nothing catches on the brackets or the wall. Small problems are easy to fix now. After weeks of daily use they are harder to spot.
The full order is: gather tools, choose the mount, measure, pick the control side, mark, drill, secure the brackets, add the center bracket, trim if needed, fit the tube, clip on covers, fit the cord safety device and test.
MISTAKES WORTH AVOIDING
A few small slips cause most of the problems. Using the biggest of the three width or drop numbers, instead of the smallest, is the most common one. It can leave you with a blind that will not fit the tightest part of the recess. Skipping the spirit level and guessing the bracket height gives a blind that leans to one side. Using one screw per bracket instead of two lets it shift over time. Leaving out the center bracket on a wide window lets the tube sag. Forgetting the cord safety clip leaves a real danger hanging in the room.
Another mistake is ordering the blind before you know which side the chain should go on. The blind arrives built for the wrong side, and the only fix is to order again.
How To Install Motorized Blinds?
The bracket steps stay the same. The only change is in Step 10. The motorized end holds the small motor. It clips into the control bracket first, in the same place a manual chain would go. The plain pin end fits into the other bracket just like a manual blind.
Set up the power and the app only after the blind is fully mounted and tested. A widemotorized blind gains even more from the center bracket in Step 8, because the motor adds weight for the tube to carry. If the blind needs wiring into the wall, aprofessional fitter is the safer choice.
FITTING ROLLER BLINDS IN A BAY WINDOW
A bay window has angled sections instead of one flat window. Each section usually needs its own blind, not one long blind across the whole bay. Measure each section on its own, using the same steps as above.
The spot where two angled sections meet needs extra space, so both blinds can open and close without bumping each other. Special angled brackets are made for this spot. Check for them before you assume the standard brackets will work.
Maintenance Of ROLLER BLIND ONCE IT IS UP
A roller blind needs very little care, but a few habits keep it working for years.
- Wipe the fabric with a dry cloth now and then. Dust on the roll can make it grip unevenly.
- Check the cord clip every few months. A loose one does not do its job.
- If the blind starts to roll unevenly or catches on one side, check the brackets with the level again before blaming the blind. A bracket can move a little after months of daily use.
- If a bracket is bent or has pulled out of the wall, replacing the bracket costs much less than replacing the blind.
ROLLER BLINDS AND CURTAINS TOGETHER
A roller blind and a curtain on the same window need hardware at different depths so they do not clash. A curtain rod does not follow the inside and outside recess rules above. It is fixed based on the width and height of the window frame. Heavier fabric needs a rod rated for that weight, so it does not sag across a wide window the way an unsupported roller tube would.
Whatever hooks or rings the curtain uses, they should sit far enough forward that the fabric never brushes the blind behind it. If the curtain is made to the exact size of the window, measuring it properly follows the same idea as the blind measurements above. Check more than one spot, and never trust a single number.
FREQUENTLY ASKED QUESTIONS
SHOULD I PICK INSIDE MOUNT OR OUTSIDE MOUNT?
Check the recess depth first. If it is deep enough for the bracket and the tube, an inside mount gives a neater, built in look. If the recess is too shallow, or there is no recess at all, an outside mount is the only real option. It also blocks more light at the edges.
WHY DO I MEASURE WIDTH AND DROP IN THREE PLACES INSTEAD OF ONCE?
Most window recesses are not perfectly square. A recess can be a few millimeters narrower at the bottom than at the top. Measuring in three places and using the smallest number means the blind fits even at the tightest point, so it does not jam halfway.
HOW DO I MEASURE FOR AN OUTSIDE MOUNT?
Measure the full width you want to cover and add about 100mm in total, so 50mm on each side. For the drop, measure from where the top bracket will be fixed down to where the blind should stop. Add 30 to 40mm if the blind has a cassette.
WHAT TOOLS DO I NEED TO INSTALL A ROLLER BLIND?
You need a tape measure, a pencil, a spirit level, a drill, a screwdriver and a step ladder. For brick or concrete walls, you also need a masonry drill bit and wall plugs.
HOW DO I KNOW WHICH SIDE THE CHAIN SHOULD GO ON?
Pick the side that keeps the chain away from furniture and busy walkways. Decide this before you drill, because changing sides later usually means new holes. If you order the blind online, choose the control side at the time of ordering.
DOES A WIDE ROLLER BLIND NEED A CENTER BRACKET?
Yes, in most cases. A long roller tube with no support in the middle can sag under its own weight and the weight of the fabric. A center bracket, added with the two end brackets, keeps it level.
WHY IS MY ROLLER BLIND CROOKED AFTER I FITTED IT?
This almost always comes from brackets that were not level when they were drilled. Put the spirit level across both marks before you drill, instead of guessing by eye. Check the level again if the blind starts to lean after a few months.
WHY DOES MY ROLLER BLIND KEEP ROLLING TO ONE SIDE?
The tube is usually not level, or one bracket sits a little lower than the other. Check both brackets with a spirit level and fix the one that is off. If the fabric was not cut square at the start, a small drift can stay, and then it is worth contacting the supplier.
IS A CORD SAFETY CLIP REALLY NEEDED?
Yes. A loose, hanging cord or chain can be dangerous for young children and pets. A cord tensioner or safety clip fixes the loose end to the wall, and it takes only a couple of minutes to fit.
CAN I DRILL INTO A BRICK WALL FOR ROLLER BLIND BRACKETS?
Yes, with the right tools. Use a masonry drill bit and a wall plug that suits the screw size. Drilling into brick with no plug gives a much weaker hold than the same screw would get in wood.
WHAT IS DIFFERENT ABOUT FITTING A MOTORIZED ROLLER BLIND?
The bracket steps are the same as for a manual blind. The only change is at the roller tube, where the motorized end clips into the control bracket first. Set up the power and the app after the blind is fully mounted, not before.
WHAT TYPES OF ROLLER BLINDS CAN I CHOOSE FROM?
Cassette blinds have a box at the top for a neater look and better light blocking. Open roll blinds leave the fabric on show and cost less. Blackout fabric blocks almost all light, while light filtering fabric lets some daylight in. Double roller systems hold two layers, often a sheer and a blackout, on one set of brackets.
CAN I PUT UP A ROLLER BLIND WITHOUT DRILLING?
Tension fit and clip on blinds exist for some recess windows. They wedge between the two sides of the recess and need no screws. They suit light fabric and smaller windows. A wide or heavy blind still needs drilled brackets for a secure hold.
HOW LONG DOES IT TAKE TO INSTALL ONE ROLLER BLIND?
About 20 to 30 minutes for one standard window once the measurements are confirmed. A wide blind that needs a center bracket, or a first attempt with no experience, can take 45 minutes to an hour.
DO BAY WINDOWS NEED SPECIAL BRACKETS FOR ROLLER BLINDS?
Often yes. Each angled section usually needs its own blind. The point where two sections meet needs enough room for both blinds to work without catching each other. Angled bay brackets, made for this joint, are worth checking for before you use standard brackets.
DO I NEED TO CUT A ROLLER BLIND TO SIZE MYSELF?
Only if it arrives a little too wide. Most blinds come made to size. Measure the gap between the brackets and check the maker’s cut guide for how much shorter the finished blind should be. Mark the line and cut straight across. A crooked cut makes the fabric roll to one side.
WHAT HAPPENS IF THE WINDOW RECESS IS NOT SQUARE?
That is normal, and it is the reason for measuring in three places. Size the blind to the narrowest point of the recess. If the recess is badly out of square, an outside mount is often easier.