Artificial turf, often called artificial grass, is a surface made from synthetic fibers that replicate the look and feel of natural grass. It is widely used in residential lawns, playgrounds, and commercial landscapes. Over the years, it has become a practical alternative to natural grass, especially in regions where water conservation and low maintenance are priorities.
One of the biggest advantages of artificial turf is that it does not require watering, mowing, or fertilizing. This not only reduces ongoing costs but also makes it a more sustainable option in the long run. However, while the maintenance is simple, the installation process requires careful planning and attention to detail.
Many people assume that installing artificial grass is too technical, but that is not entirely true. With the right tools, proper preparation, and a clear step-by-step approach, it is possible to achieve professional-looking results. This guide walks you through the complete process in a structured and practical way.
Types Of Equipment Required
Before starting the installation, it is important to gather all the necessary tools. Having everything ready will save time and prevent interruptions during the process.
You will need a cutter, a sharp knife, joining adhesive, and joining tape for accurate cutting and secure bonding. A measuring tape is essential for precise layout planning, while a hammer and steel nails help in fixing the turf firmly in place. Gloves should always be used for safety, and a stiff brush is required for the final finishing stage.
In addition, edging materials such as Vert edges and their adhesive are used to define boundaries and maintain structure. These tools may seem basic, but each one plays a critical role in achieving a clean and durable installation.
Understanding The Installation Process
Installing artificial turf is not a single-step task. It is a sequence of carefully planned stages that build on each other. Skipping or rushing any step can affect the final outcome.
The complete process can be divided into eight key steps:
- Planning the layout
- Clearing the area
- Installing edges
- Preparing the base
- Fixing the weed membrane
- Laying the artificial grass
- Trimming edges
- Applying finishing touches
Each step has its own importance, and following them in the correct order ensures better durability and appearance.
Step 1: Make A Clear Plan
Every successful installation begins with proper planning. Start by measuring the area where the turf will be installed. This helps you determine how much material you will need and how the turf pieces will be arranged.
Think about the direction of the grass fibers as well. Installing all pieces in the same direction creates a more natural and consistent look. Planning also includes deciding where joins will be placed and how edges will be secured. A well-thought-out plan reduces mistakes and ensures a smoother workflow.
Step 2: Clear The Required Area
The next step is to prepare the ground. Remove the existing surface to a depth of about 2 to 3 inches. This includes natural artificial grass, old turf, weeds, and debris.
Make sure to remove stones, bricks, and any obstacles that can affect leveling. A clean and stable surface is essential for long-term performance. If the base is uneven at this stage, it will create visible issues later. This step may seem simple, but it lays the foundation for everything that follows.
Step 3: Install Edges
Edging helps define the boundaries of the turf and keeps it in place. Install the edging system around the perimeter of the area. Use a hammer to secure it into the ground, leaving a small portion slightly exposed.
Materials like Vert edges are commonly used because they provide flexibility and durability. Proper edging prevents the turf from shifting and gives a neat, finished appearance. Without strong edges, even a well-installed turf can lose its shape over time.
Step 4: Prepare The Base
The base layer is one of the most important parts of the installation. It provides stability, drainage, and a smooth surface for the turf.
You can use granite dust or sharp sand for this purpose. Spread the material evenly and maintain a consistent depth. Granite dust is usually applied in a thinner layer, while sand may require a slightly thicker base. After spreading, level the surface using a flat tool or wooden plank. Compact the base properly to avoid sinking or uneven spots later.
Step 5: Fix The Weed Membrane
Once the base is ready, install a weed membrane over it. This layer prevents unwanted plant growth while still allowing water to drain through.
Secure the membrane using steel nails, placing them at regular intervals. Make sure the sheet lies flat without wrinkles. If multiple pieces are needed, overlap them slightly and join them using adhesive tape. This step protects your turf from future damage and reduces maintenance issues.
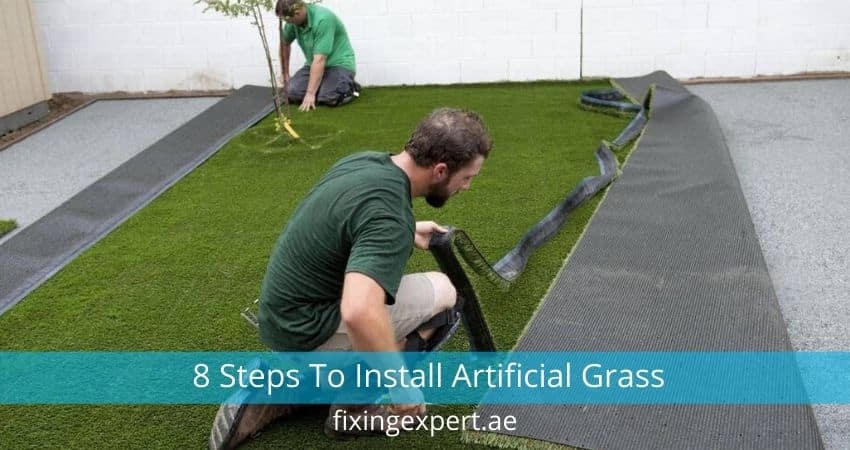
Step 6: Install Artificial Grass
Now comes the most visible part of the process. Unroll the artificial turf and place it over the prepared area. Allow it to settle for a while so that any folds or creases can relax.
Ensure that all pieces are aligned in the same direction. This detail is often overlooked but makes a significant difference in the final look. Carefully position the turf without disturbing the base or membrane. At this stage, avoid fixing it permanently until you are satisfied with the alignment.
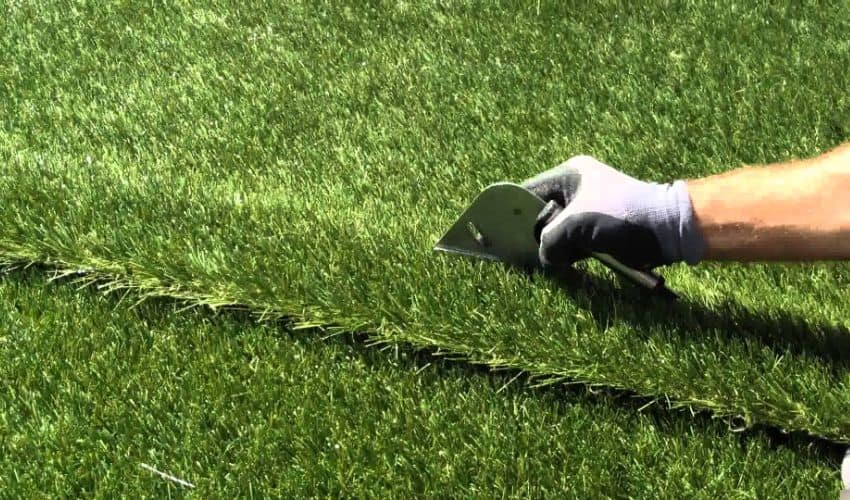
Step 7: Trim The Edges
After placing the turf, trim the excess material along the edges. Use a sharp knife for clean and accurate cuts. It is recommended to change the blade regularly to maintain precision. Take your time during this step, as uneven cuts can affect the overall appearance. Proper trimming ensures that the turf fits perfectly within the defined area.
Step 8: Apply Finishing Touches
The final step is to enhance the look and stability of the turf. Spread kiln-dried sand evenly across the surface. This helps the fibers stand upright and gives a more natural feel underfoot.
Use a stiff brush to distribute the sand and lift the grass fibers. Typically, around 6 to 8 kilograms of sand per square meter is sufficient. This finishing process not only improves aesthetics but also increases durability.
Important Precautions To Consider
Even if you follow all the steps correctly, certain mistakes can still affect the results. Paying attention to key precautions can make a noticeable difference. An even surface is essential. Any unevenness will be visible and may cause discomfort while walking. Proper drainage is equally important, as water buildup can damage the turf over time.
Make sure all joins are aligned and consistent. Poorly joined sections can ruin the overall look. Edges should be firmly secured to prevent curling, and the quality of the turf itself should never be compromised. A good installation cannot compensate for low-quality materials.
Frequently Asked Questions
Can Artificial Turf Be Installed On Soil?
Yes, but direct installation is not recommended. The soil must be excavated, and a proper sub-base should be added along with a weed membrane and sand layer. This ensures stability and drainage.
Can Artificial Grass Be Installed Over Natural Grass?
No, installing turf over natural grass leads to uneven surfaces and potential weed growth underneath. It is always better to remove the existing grass completely.
Which Type Of Sand Is Best For Artificial Turf?
Sharp sand, also known as grit sand, is commonly used. It provides effective drainage and helps create a stable, level base.
Final Words
Installing artificial turf is a process that demands patience, precision, and proper planning. While it may seem challenging at first, breaking it down into clear steps makes it much more manageable. If you focus on preparation, use quality materials, and follow each stage carefully, you can achieve results that look professional and last for years. The key is not to rush the process, especially during base preparation and alignment.
Artificial turf is a long-term investment. When installed correctly, it transforms any outdoor space into a clean, green, and low-maintenance environment that stays attractive throughout the year.